Search This Blog

What I'm up to.

Template now how I want, still no M.horse progress :( :( :(


Showing posts with label Salamanders. Show all posts

Friday, 23 April 2010

Salamanders: Idea for my version of 'Vulkan He'stan'

So, I am planning on doing a Vulkan conversion as well as maybe a lysander conversion for the salamanders (perhaps lysander will be terran hands, my own custom chapter). Now I don't want my He'Stan to actually be Vulkan as that doesn't fit with my fluff, so instead I just want him to be the leader of my force. So, lets break down the important parts needed:
  1. Some kind of flame weapon.
  2. An amazing cape of scales.
  3. A master crafted relic blade.
I think it would be cool to make th flame weapon his mouth and instead of just a cloak, maybe to have his whole armour covered in scales (I would add a cloak too as they are just cool) The master crafted relic blade could be anything.

With that in mind, my guy would be a normal marine with scale texture on his armor and a modified mouth piecu/helmet to launch flame plus some kind of big smash you weapon. His weapon might end up being a thunder hammer becuase that is the chapters siniture CCW, that also fits with the theme of all thunder hammers becoming master crafter when vulkan is in the army. I could also combine the bolt pistol and digital weapons into one thing, This could become part of the chest or hand, not sure yet, maybe I could use one of those new angelus boltguns.

For Lysander I am not sure his main features are:
  1. The fist of dawn, a big whopping thunder hammer.
  2. Terminator armor.
For Him I was thinking of perhaps Making him kind of like one of the battle knights from mechanicus, kind of like dreadnoughts, I would obviously make him smaller than a dread though. He would be wearing a custom made chapter suit kind of like calgar. So, it would need a big enclosed casing but still with a helmet/ head visible along with a shild arm for the storm shield and a massive hitty thing for the thunder hammer. I mau use an eldar war walker as a base but then have stabliser legs instead of thin ones and obviouly different army. I need to have a bit more of a think about this one.

Oh, yea, over the next 2 days I am a way with a mate so maybe there will be posts maybe not, tell us what you think and if you have any ideas. Thanks for reading,


Jacob.

Wednesday, 13 January 2010

Tutorials/Army Finishing Project: Sally squad finished and conversions on regular guys.

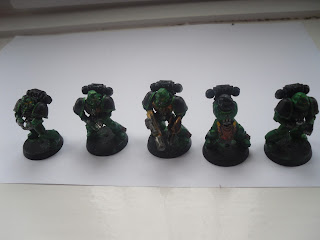
Hi, recently I have finished the 10 sallies, here are the pics:


If you look carefully at that last picture, you'll notice that the power fist is metal with blue and green washes, now this is my new theory for power weapons. It always says in fluff that they are sheathed in power so this wash gives that effect. All it is is thraka green and asurmen blue or watered down blue. On power swords and claws you would still do the power line as well of course. Now, here comes the tutorial:

Coverting regular guys is quite a rtecent thing. I've found though that just a few small conversions in a unit really makes it pop. Now if you look at my guy with bolt pistol and bolter, his strong pose really makes him look real, whereas the guys just holding bolters normaly stop the unit from looking over the top. So, I know that this isn't really a tutorial but just think next time you build regular guys, could I change that.

Now, onto the Army Finishing project standings, I am noow on 11 points.


TERRAN HANDS AND SALLIES


4pts 2 half done land speeders for terran hands, tutorial: not sure.
2pts LR-built-painted-needs some slight changes tutorial: repainting.
-2pts 5scouts- built tutorial: cloth
4pts Rhino-built-primered tutorial: getting nice flat colours and possibly line highlighting.
2pts Dread-needs some repairing and some redoing tutorial: adding to models.
5pts 5assault marines: built tutorial: adding the combat image.
1pts some reapir work. tutorial: probably none.
SPACE WOLVES Tutorials: not sure yet
3pts Drop pod-built
10pts 20 grey hunters- built
-1pts 5wolf scouts-built
3pts 4long fangs-built
4pts Whirlwind-half built
3pts 4wolf guard- built
2pts Rune priest- built
2pts 10 blood claws- need highlights

P.S. I have included the wolf guard joining units in that units cost.

Warriors Of Chaos
6pts 5knights- built-primerd-1 nearly done. tutorial:washes and magic

3pts warshrine-primered-more being added. tutorial: scratch building.
5pts 12 WoC- built primered. tutorial:adding to units maybe
3pts 12 WoC-need details. tutorial:fur
12pts 15 marauder cav- built tutorial: painting black skin maybe more
10pts 20 marauders- need details tutorial: wood
-4 Palanquin- built- partialy painted tutorial: intricate nurgle
-6 to do but +3 when done Lord on disk tutorial: probably fire
-3 odd dude from Games Day- built tutorial: random models.


Thanks for reading,

Jacob.

Saturday, 26 December 2009

Salamanders: Reedeemer finished (pics included).

So, I have finally finished the Reedeemer, the pics below show it in it's done form but the tutorial for this one was adding that extra bit so you will only see it with that extra bit when I post up the tutorial (will be up soon). Anyway, finishing this puts my painting points total up to 8 so, not doing to bad. I have also realised that I have two land speeders to finish so they have been added to the project list below. The pics are under the project list/


TERRAN HANDS AND SALLIES

5pts Reedeemer-built-primered-half painted tutorial: adding that extra bit.
4pts 2 half done land speeders for terran hands, tutorial: not sure.
2pts LR-built-painted-needs some slight changes tutorial: repainting.
-2pts 5scouts- built tutorial: cloth
5pts 10sallies- nearly done tutorial: conversions on regular guys.
4pts Rhino-built-primered tutorial: getting nice flat colours and possibly line highlighting.
3pts 2sallies rhinos- need details tutorial: writing on tanks.
2pts Dread-needs some repairing and some redoing tutorial: adding to models.
5pts 5assault marines: built tutorial: adding the combat image.
1pts some reapir work. tutorial: probably none.
SPACE WOLVES Tutorials: not sure yet
3pts Drop pod-built
10pts 20 grey hunters- 20 built
-1pts 5wolf scouts-built
3pts 4long fangs-built
4pts Whirlwind-half built
3pts 4wolf guard- built
2pts Rune priest- built
2pts 10 blood claws- need highlights
P.S. I have included the wolf guard joining units in that units cost.

Warriors Of Chaos
6pts 5knights- built-primerd-1 nearly done. tutorial:washes and magic
3pts warshrine-primered-more being added. tutorial: scratch building.
5pts 12 WoC- built primered. tutorial:adding to units maybe
3pts 12 WoC-need details. tutorial:fur
12pts 15 marauder cav- built tutorial: painting black skin maybe more.
10pts 20 marauders- need details tutorial: wood
-4 Palanquin- built- partialy painted tutorial: intricate nurgle
-6 to do but +3 when done Lord on disk tutorial: probably fire.
-3 odd dude from Games Day- built tutorial: random models.

Anyway, here are the pics:


I'm quite pleased with this actually, how about you. Thanks for reading,

Jacob.

Monday, 14 December 2009

Army Finishing Project: Much progres on WIPs.

Hi, over the last week or so I have been making progres on my Reedeemer, a terran hands rhino (repainted) and a WIP tac squad. On with the pics:


Here is the Reedeemer The gold was painted iyanden then twice shining gold then very very heavy wash devlan.


I ran our of boltgun so the maetals are mithril silver heavily washed with badab black.


Now for the marines, sorry for bad lighting in these pics.


On these I just did some little things like some highlighting, next is final details and arms/boltguns, should be good when there done!

Finaly the rhino, not many pics at the moment as it is just as you see there. This is just a bog standard job.

So, what do you think. Have you been enjoying the army finishing project, I know I have. Not going to be much warhammer coming my way this christmas but hey ho. Thanks for reading,

Jacob.


Wednesday, 9 December 2009

Tutorials: Writing on tanks (11 pics).

Hi, Just thought I'd do the tutorial on how I did the writing on the sally rhinos, reme3mber this isa also a bpart of the army finishing project, here we go:

Step 1, placing: choose where on the model you want the writing, make sure to do this carefully as it is very important.

Step 2, draw it: Get a pice of paper and draw out what you want your writing to say, I called one of my rhinos Fire Drake and the other Carinus. Here is how I drew out Fire Drake.


Step3, paint 1: paint the letters carefully with only simple curls etc, make sure to print it and not join up as this will make it neater.


Step 4, paint 2: Paint on your other locations (I had 2).

Step 5, joining up: It's hard to see butb here I have carefully joined up the letters.


Here are the close-ups of my other tank so you can see the step by step again.


So, what do you think, like it. Do I need to improve anything. Thanks for reading,

Jacob.

Tuesday, 8 December 2009

Army Finishing Project: 2 Sally Rhinos finished.


Hi, Jacob here, I have now finished my two sally rhinos, here is the new army finishing project list:

TERRAN HANDS AND SALLIES


5pts Reedeemer-built-primered-half painted tutorial: adding that extra bit.

2pts LR-built-painted-needs some slight changes tutorial: repainting.

-2pts 5scouts- built tutorial: cloth

5pts 10sallies- nearly done tutorial: conversions on regular guys.

4pts Rhino-built-primered tutorial: getting nice flat colours and possibly line highlighting.

3pts 2sallies rhinos- need details tutorial: writing on tanks.

2pts Dread-needs some repairing and some redoing tutorial: adding to models.

5pts 5assault marines: built tutorial: adding the combat image.

1pts some reapir work. tutorial: probably none.


SPACE WOLVES Tutorials: not sure yet


3pts Drop pod-built

10pts 20 grey hunters- 10 built

-1pts 5wolf scouts-built

3pts 4long fangs-built

4pts Whirlwind-half built

3pts 4wolf guard- built

2pts Rune priest- built

2pts 10 blood claws- need highlights


P.S. I have included the wolf guard joining units in that units cost.

Warriors Of Chaos


6pts 5knights- built-primerd-1 nearly done. tutorial:washes and magic

3pts warshrine-primered-more being added. tutorial: scratch building.

5pts 12 WoC- built primered. tutorial:adding to units maybe

3pts 12 WoC-need details. tutorial:fur

12pts 15 marauder cav- built tutorial: painting black skin maybe more.

10pts 20 marauders- need details tutorial: wood

-4 Palanquin- built- partialy painted tutorial: intricate nurgle

-6 to do but +3 when done Lord on disk tutorial: probably fire.

-3 odd dude from Games Day- built tutorial: random models.

This means that my painting point total stands at: 3 a good start. Here are the pics:


So, tell us what you think. Thanks for reading,

Jacob.
Monday, 21 September 2009

Tutorials: How to paint blood, quick and simple.

Hi, todays tutorial is abput how to paint blood. Now remember, all of my tutorials are done on a basis of 'this won't give you amazing standards but will look like what it's supposed to, anyway along with my tutorial:


Before pic. I always like to let you see the guy before aswell as after.

It's hard to see but I have painted rd gore over where I want the blood to be.


Then finally highlight with blood red. If the cut is almost dry then you can leve more of the cut red gore. If there is a bit of a scab the use blck and highlight brown. This entire tecnique would look better over a larger area but this is what I had to work with.


Thanks everyone and please let me know if you think he looks better/worse after the blood.


Thanks for reading,


Jacob


Saturday, 5 September 2009

Competitions: Name my Salamander Rhinos.


Hi, this time I will be hosting my first competition. Now this one has no prize exept for bragging writess of course.

The competition: Look at the photos below and try to come up with a name for either rhino 1 or rhino 2. Once you have come up with a name you then comment on this post with your entry, in a few weeks time (date to be decided) I will choose a winner for each rhino and their chosen name will be painted onto it.

Rules: You may enter as many names as you like, the winner will be chosen by me and will be the name I like the most. Now I have thought of one name that has already been used a lot but may give you and idea, it is Fire Drake. Any way, on with the pics.


Rhino 1)


Rhino 2)


Please enter because it's free. Thanks for reading,


Jacob out.

Monday, 24 August 2009

Salamanders/WoC: Marauders half sprayed, 3 rhinos and 2 speeders fully sprayed.

So, I ran out of spray half way through spraying the marauders but I did mannage to do the rhinos and speeders, info bellow each pic.

The whole lot.
I really like the look of these guys, the musician has a converted musical instrument. They cound as having spears (not throwing spears) and hand weapons and shields.

Overall these are my favourites they count as being armed the same as the other unit but I didn't want them looking exactly the same.

Now for the flail guys which are a really useful unit and I really like using them.


Now for the 40k. As you can see all the stuff is sprayed. At the time of posting two of the rhinos have the green on them and one has the metal started.


Here is a little peak at what is to come. It is WoC but you can try and guess what it is the start of. All will be revealed in a few days.
Thanks for reading everyone and please comment if you know what that greenstuffed thing will be.

Saturday, 22 August 2009

Tutorials: How I paint parchment, tabards, scrolls etc. The easy way

Hi, when I was away I was painting my WIP marine squad and I had the parchment tabard thing to do so I thought I'd show you how I do my parchment.


1: Colours)The 3 main colours are: Tallarn flesh (base), Elf flesh (main colour) and Bleached bone (highlight) though other colours are used in the tutorial.


2: Base coat) Apply tallarn flesh over a black undercoat for a nice even base. Sory for the awful pic but you get the idea.


3: Main coat) This may take a few layers but make shure you get this stage right.
4: Highlight) Now just hit the hard edges with bleached bone, you can add white over multiple coats if you want multiple highlight staged but I just stick with straight bleached bone. It's quite hard to see in this pick but it makes all the difference.


5: optional: wash) Now this is where you have to make a desicion between aged or new. If you are going for a new scroll then skip this step but if you want an aged scroll (in my opinion the better option) then wash the whole thing heavly with the fantastic Devlan mud wash.
quick tip: the wash may pool or run into one side of the scroll. On this model I had to do 1 coat with him upside down and then another with him standing up to get a good coverage.


6: kind of optional: detail) Thia stage is kind of optional but it makes the tabard look a whole lot better. I have just done a bit of text and a couple of symbols using just a few colours.


Thanks for reading and I hope this is useful. Next i will be doing a tutorial on how to do that writing and symbols etc on tabards. Hope you come back.

Jacob out!

Related Posts with Thumbnails